Due to the weight of solid silicone, the puppets need as much lightweight bulk underneath the skin as possible, in order to reduce the thickness of the skin, reducing weight as well as cost. Often times silicone stop-motion puppets are bulked with foam latex. I'm not sure how this is done, as platinum cure silicone does not like latex. But in any case, foam latex is very tricky to work with, and it needs precisely controlled baking ovens, which I don't have access to.
Therefore I explored methods of creating as much lightweight rigid skeletal bulking as possible.
What I ended up with is a mix of Fimo Air Light, DualWood lightweight epoxy putty, and polyurethane sponge foam for the soft parts.
Therefore I explored methods of creating as much lightweight rigid skeletal bulking as possible.
What I ended up with is a mix of Fimo Air Light, DualWood lightweight epoxy putty, and polyurethane sponge foam for the soft parts.
THE ARMATURE SAGA

I am sorry to have to publicly announce that I will not use animation supplies.net armature components in the future. It would be upsetting to calculate the actual amount of time I have spent throughout the months trying to make them work for me. Each time I have tried to bring the puppets closer to completion, I have run into the heavy setback of dealing with there problems with these armature parts.
Andy's design is basically a simple two plate, double-ball joint. To make a one-ball joint he used the same plates, and made a "non-round ball" to use in the place of one of the two balls. This he ships with a Rite-Loc glue designed for threaded engine parts, which he claims holds everything together perfectly. This glue is designed for very tightly secured threaded elements. I soldered all the balls onto their rods instead of using the glue, as the glue would not hold. I did not, however, solder the fixed "non-round balls" to one of the plates because I was afraid of creating the slightest bulk with solder that might affect the performance of the joint.
Specialist mechanical pieces should only be asked to perform the one task they were designed to perform. Andy is asking these components to perform two opposing tasks, one of allowing fluid movement at one end, and at the same time not moving at all at the other. Because of this, the joints must be kept at maximum tension at all times, in order to keep the "fixed" end from moving. This tension puts much strain on the solder holding the armature together.
Not only this, but it also contradicts an important aspect of a stop-motion ball and socket armature, which is to allow the animator to adjust the tension as desired.
I found also that after heating the rods to solder the armatures together, these threaded steel rods softened to the point that they bent like thick wire. I later had to deal with this by coating them in milliput, as seen below.
Andy's newer edition of armatures has adopted a different kind of screw to hold the plates together. This, I found, reduces their bulk, but seems also to lower the performance of the joint.
Andy clearly designed his armature components with a character design in mind mostly made up of double-ball joints. My original armatures were made with 18 joints (mixing Andy's and John Wright's). Of these 18, only 3 were double-ball action. When I had John Wright's studio make a new and smaller armature for Anna, the availability of different sizes and kinds of joint meant that she could be redesigned to have 16 joints, with 4 of these being double-ball action, and with a far greater anatomy and performance.
I did make the puppets for Solo Duets using only animationsupplies.net components, and I think they can be great for people who make claymation films where the character design is less focused on human anatomical correctness as mine. But unfortunately for my needs they won't do, and this saddens me.
Throughout this blog I have spoken about my difficulties with the armatures. Here above I was trying Araldite Steel to fix the "non-round" parts to one of their plates. This failed just like the Rite-Loc, so I ended up building a hugging bone in milliput. On the 14th of June, after finishing the rigid skeletal bulk, as described further down, the solder in Isolde's hip came undone because of the amount of tension it was under.
I don't feel I can risk this happening again at any point after completing the puppets.


Above left: original armatures mixing AS and JW components
Above right: JW armature fro Anna
click to enlarge.
 |
| break point in Isolde's hip, 14th June, 2012. |

Milliput bones to keep the steel rods from bending.
CREATING A SKELETAL BULK

I started to lay clay into Madame Fontaine's mould to form the thickness of skin that I could work the skeleton up against. The softer Chavant is terracotta colour, quite red, which would helpt later cleaning it out from the mould. It gave the whole process quite a sense of the anatomical.

I removed the clay belly, as that needs to stay soft. I may try layering polyurethane sponge or something to bulk the armature in that area.

Building a wax wall as a guide for the milliput clavicles.

Built the clavicles in milliput, laying it into the mould and onto the armature.

The white bone mass is made from EfaPlast Light (from Eberhard Faber). There are stronger epoxy equivalents (such as Smooth-On's Free Form® Air Epoxy Putty), but this seems sufficiently rigid, air dries, and is non toxic. Plus I had some already.

First time milliput adhered to everything except itself!

My second and more successful test casting of upper body to see how the clavicle bones work under the silicone skin. Working with this material is a process of trial and error, but it is also very exciting. Some things are working out surprisingly well and living up to my hopes and designs. It needs some more thought, as the skin over the clavicle is too thin and tore immediately. Movement seems good, however.


If I am able to find a solution against the tearing, the clavicle design will be successful. I am also very pleased with how the Platsil Gel 10 behaves in the neck area. I've always wondered whether I would need to run hard tendons and muscles up the neck to maintain its structure during turning of the head. But the silicone seems to do this itself. The loose skin in the neck of the old lady mimics reality in movement quite wonderfully.

Ron Cole's description of how he made his fantastic cable controlled heads for his short 'In the Fall of Gravity' brought me to try some different sets of tights, looking to reinforce the silicone skin. From this test it was clear the nylon made a big difference.

I sponged two thin layers of Platgel into the mould, and layered down some pieces of the finer denier stocking.

And I also tried gluing some onto the bones with Araldite. Not sure if there is a glue that will work for this though.
I placed some polyurethane sponge in the gap between rib cage and clavicle, hoping to keep silicone from filling it, stiffening movement and adding too much weight.

The skin over the clavicle tore a little again, during de-moulding. So I must make sure to use release agent in the future.
Also the Araldite did not secure the nylon to the bone, so the skin lifts from the chest in certain movements, as you can see in the video below.
A little demonstration of my Clavicle design. I hope Friends will forgive me for using their track.
SKELETAL BULK PART II
Using this test as a prototype for the skeletons of the main characters, I began laying thin rolled strips of clay into the moulds of Isolde, Russeau, and Anna, thinning it out in some places where I felt the skin should be thinner.
I decided that since the Fimo Air Light hardens naturally in the air, shutting it into a mould would lead to a terribly slow hardening time. So I decided to try milliput against the armature, with a thick layer of Fimo over that, which could dry outside of the mould, and an outer shell in milliput, up against the mould, as milliput hardens chemically, with no need for air.
Working on these three things simultaneously, I found that the Fimo did have a strange texture and consistency (it may be made of powdered paper or something), but that in the end it was actually easier to shape with tools, as it is non-toxic, far less messy, and I was able to leisurely work with ungloved hands.
Building the outer shell in milliput, I found that cling film helped as a safe barrier between things, allowing me to test the fit at will.
Yesterday, however (2nd June, 2012), I decided I didn't like the weight and rigidity of the milliput, and preferred to wait for the Fimo to slowly harden in the mould. If it will at all.
So I worked the front of Anna's outer shell into the mould with Fimo, and in a couple of days will open the mould and let her continue to harden until she is ready. Meantime I will try carving a pasta bowl out of the Fimo Air.
Entry from June 22nd, 2012

Laying rolled clay into Isolde's mould

Russeau's chest with milliput outer shell. This seemed too heavy in every sense of the word.

Anna, Isolde, Russeau, all in Fimo Air Light. This photo was taken after de-moulding the two adults, cleaning them up a little, and Isolde's hip joint breaking (June 14th, 2012)

The adults were set aside after the latest armature drama, and I continued with Anna, building her skull in Flockart's Dual Wood.
Her skull needed a contact point to rest against in the mould, for casting, and I decided the best solution would be for it to rest against the back of the eye beads. I therefore embedded two eye beads into the skull, which would register and rest on the beads for the eyes.

cleaning out clay to cast the clavicle bones. With the clay laid in it was impossible to distinguish the shape of the bone, so I decided to use the bare mould, and afterwards shave the cast back a little.

I made the clavicles and the skull in Flockart's DualWood, light weight two-part epoxy. It is quite toxic, so I don't enjoy using it, but it is much lighter than milliput, and has similar properties.

Clavicles sanded down. I was annoyed with myself that I didn't start by making just one, so that I could compare a cast with silicone, and see if the bones helped or not.

Before casting I bulked around the large back joint with polyurethane kitchen sponge, and used a stocking to contain it. I am still poor at sewing.

FIRST CASTING TEST.
Sponged a very thin layer of Platgel in the face, without pins and eyeballs, to be sure to coat the eyelids. It was a case of sponging it on, and then wiping it off again. I then put the eyeballs in place, and after the first coat cured, I brushed a thicker coat into the whole face, making sure to leave the back of the eyeballs clear as a contact point for the skull. Later I found that the eyeballs need a release agent. I also sponged the rest of the body.
After two or three coats on the entire body, I added two large strips of 15 Denier stocking from below the breasts to the shoulders, and with enough length to then go down the back.
After curing I placed the armature in the mould. The beads in the skull resting on the eye beads.
I had the colour mix in oil paints pre-mixed and in a jar, so was able to make small mixtures at a time of coloured Platgel to slowly fill around the armature. Now that the days are warmer things set up much more quickly.
I tried casting one half, cleaning up the edges with scissors, and then doing the other half. This failed, and I don't know if it could be done better a second time, or if I will have to try injecting silicone into the closed mould.
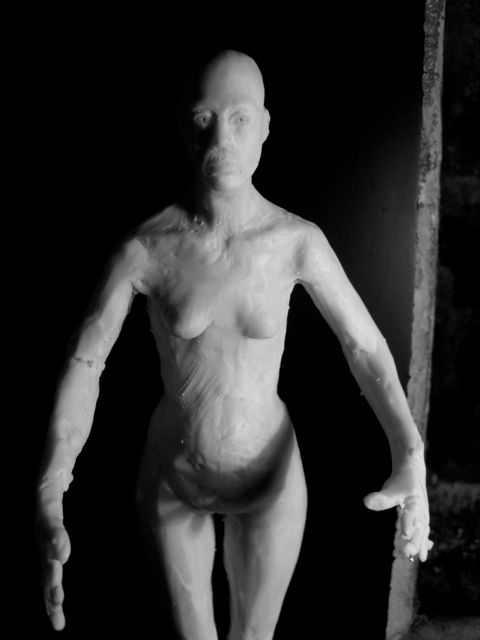
First full cast with an armature inside. It is only the front half of Anna, but enough to see some problems and, more importantly, many successes.
Her clavicles function perfectly. The stocking keeps the thin skin intact, and the bones are perfectly in place at all times. Frankly they could not have been more successful. I am very pleased.
Her skin ripped under her chin during de-moulding. I will need to shave back part of the skull a little to allow more thickness there. Apart from this, the face cast perfectly, and the movement in the neck is beautiful.
Her eyes, however, for some reason adhered to the silicone, so they will need release agent next time.
Her belly, back and waist work very well. They crumple in at the tummy when she slouches forward, but in a realistic way.
Her hips bend very nicely, and her legs are beautiful. However, there is too much silicone in the hips to allow for free movement, so I need to find a way to bulk this area with sponge.
All in all I am very pleased.
22nd June, 2012